Fabric Friendship Bracelet

Fabric Friendship Bracelet:


What you'll need:

- fabric strips (about 2ft long, preferably cotton)
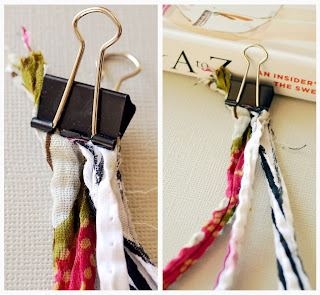
- a clip to hold your fabric

How to do it:

1. Choose 3 strip of fabric. Secure it with your clip to keep it in place.


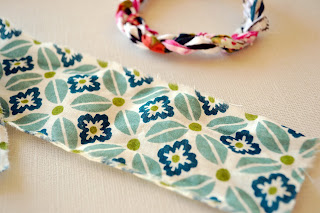
2. Start braiding your fabrics. When you get close to the end, measure the bracelet to your wrist.
Since this is a slip on bracelet, you would want to make sure you have enough room to wiggle the bracelet over your hand.


3. Once you have made the bracelet to fit your hand, sew both ends of the bracelet together. Make sure that all the fabrics have been sewn together.


4. Trim off the strings and cut the fabric to just above where you sewed.


5. To cover up the sewed edges, cut or tear a piece of fabric about 2 inches wide and about 8 inches long. Slip the fabric into the bracelet where you sewed the ends and tie a single knot. Trim off the extra fabric from your knot. 


Enjoy!


DIY Gold Twig Bangles

DIY Gold Twig Bangles: 

How to make your own twig bangle.

What you'll need:

- Some twigs (Fresh is best as they are more bendy than if they have dried out)
- Gold Metallic Spray Paint
- Glue or glue gun
- some thread

Below you can find the link to buy the Gold Metallic Spray Paint as well as the hot glue guns. I would say that the Kyrlon spray paint has a nicer finishing touch than the Rust Oleum one but then it all depends on your budget. I prefer using the KSANA one but I find that the mini high-temp one works quite well and is useful for small projects such as this one. 


How to do it:

1. Cut the twigs into lengths to make a circle that fits your hand.
2. Bend them into the rounded shape, doubling up the end.
3. Wrap the doubled up end with thread to secure the bangle shape.
4. Put a dot of glue and to secure the thread.
5. Spray paint the bangles – making sure to coat entirely. Do a few coats if necessary.
6. Let dry completely.


Enjoy!

Romwe Generic Fall & Winter

The Hippie Bracelet


The Hippie Bracelet:

What you'll need:

- 7 embroidery threads, 60 inches each (folded in half to make 14 working strings)

What you'll need:

1. Start with your favorite way of starting a bracelet. this could be a buckle, a braid on each end (in this case, your starting strings should be a bit longer), or a simple overhand knot. I chose to make my version of the buckle. Search the tutorial page for directions.


2. Pick your first color. This will be your first wrapping string. Set aside.


3. Pick two more strings. These will be your "criss-cross" strings. These strings are optional; you may use them once in awhile, or not at all. They can be the same or different color. Set aside.


4. With your optional criss-cross strings up and out of the way, take your wrapping string and make half a forward knot around the rest of your strings.


5. Begin wrapping! Simply wrap this thread tightly around your bunch of strings, making sure there is no overlap or spaces.


6. Decide how much of your bracelet you'd like wrapped in this color. You could wrap your entire bracelet in this color, but for this bracelet, I'm going to stop at about 3/4 inch. To keep the string from unraveling, tie another half forward knot.


7. Now's the time to use your optional criss-cross threads. take the two strings and tightly criss-cross the threads a few times around the section you just wrapped.


8. Holding your criss-cross threads in place, choose another wrapping thread and two more criss-cross threads. Set your new criss-cross threads aside, use your new wrapping thread to tie a half forward knot around all remaining threads, and repeat!


Enjoy!

A cute little vintage idea

Vintage shoe box suitcase:

What you'll need:


- Shoe boxes
- White paint
- Markers

How to do it:

1. Grab your shoe boxes.

2. Paint them in white.

3. Let them dry.

4. Then doodle on them to make them look like vintage suitcases.
Done! So so simple!

Enjoy!

DIY Watercolor Pillows

DIY Watercolor Pillows:

https://www.etsy.com/listing/205705529/watercolor-pillow-throw-pillow


What you'll need: Scroll down to see where to purchase stencils, paint and sponges

- pillowcase or cushion case
- acrylic paint or fabric paint (not watercolors)
- water
- brushes
- card board
- stencils
- sponge

How to do it:

1. Grab your pillow case.


2. Mix some water with your paint. The thinner the paint the lighter the color. Test it on some scrap fabric first, and start with a lighter color if you're worried. You can always add more paint later.

3. Make sure to put a cardboard between the layers of your pillowcase before painting so that the paint doesn't go through both layers.

4. Choose your design. I usually like to use wall stencils or tile stencils as I think it gives a certain charm to the pillow. To blend in the colours you can use a sponge by gently dabbing it. The not wet the sponge or it'll smudge your design.


Listed below are the items you need to recreate this pillow. They are all available on Amazon at a very reasonable price. This stencil is one of my absolute favourite patterns and just looks amazing anywhere! I mean imagine how it would look on your couch or bed or even as a birthday present?!


Here are some other inspirations:


For the giraffe and sea turtle watercolour pillow, you can use a similar stencils also available on Amazon:


5. Once you have finished your design, let it dry overnight.

And there you have it. A beautiful watercolor pillow! I hope this tutorial was helpful!

Enjoy!

Paper Butterflies

Paper Butterflies

What you'll need:


  • Old wall paper cut offs or thick pretty paper. I used the same paper for the whole project. I had off cuts of the Osborne & Little paper 'Soubise' that really suited Miranda's moroccan-esque nursery.
  • A printer and A4 paper for making your stencils.
  • Bits of cardboard.
  • A pencil.
  • Paper scissors.
  • Blu tac.

How to do it :

1. Print out some butterfly shapes - you'll find a ton via a Google search. Then cut out the butterflies from the paper. The different sizes make the result much more interesting and realistic.


2. Trace around the paper onto the cardboard and cut them out. Alternatively, you can print straight on to cardboard if your printer is that talented. These are your stencils!


3. Trace lots and lots of the butterflies onto the back of your paper and cut them out.

Cutting them out is the kinda thing you can do in front of the TV. It takes about an hour. You'll get really fast at it. They don't have to perfectly cut either, they just have to look like butterflies.

Fold them down the middle so they have little flappy wings!


4. Ok this is the fun bit. Put a dot of blu-tac on the underside and start attaching them to your wall. Pinch the wings up a bit and press into the spine with your thumbnail to stop them attaching flat to the wall.

There is a teensy bit of design in the arrangement of the butterflies. You want them to sort of move in the same direction.  Mix up the sizes. I thought the little ones were more like to stray so I added a few of them around the edges. I followed a general funnel shape - as if they were all flying out of a box into the open air!


All done! Now admire your work.


Enjoy!


DIY book clutch


DIY Book Clutch: inspired by Natalie Portman's Lolita Book Clutch

What you'll need:

- a hardcover book
- a clasp
- glue
- a paintbrush
- a ruler
- an x-acto knife                                                                                              


How to do it:


http://runwaydiy.com


Enjoy!
Shop SheIn for the latest in Fall and Winter Fashions